About

Labels

التسميات

contact us

الاسم

بريد إلكتروني *

رسالة *

قسم 2

يتم التشغيل بواسطة Blogger.

Translate ترجمة

Contributors

بحث في المدونة

المواضيع النشطة لهذا الاسبوع

a

a
‏إظهار الرسائل ذات التسميات appel. إظهار كافة الرسائل

السبت، 21 فبراير 2015

How to use AirDrop to instantly share files from your iPhone or iPad

AirDrop helps you to quickly and simply transfer files between iPhones and iPads (and Macs). It uses Bluetooth Low Energy to broadcast, discover, and talk terms connections, and point-to-point Wi-Fi to transfer data. that produces it power economical, fast, and secure. once you are exploitation it between iPhones and iPads, you'll be able to bringing photos, videos, contacts, bankbook passes, Voice Memos, Map location, and any and everything else that seems on a Share sheet.

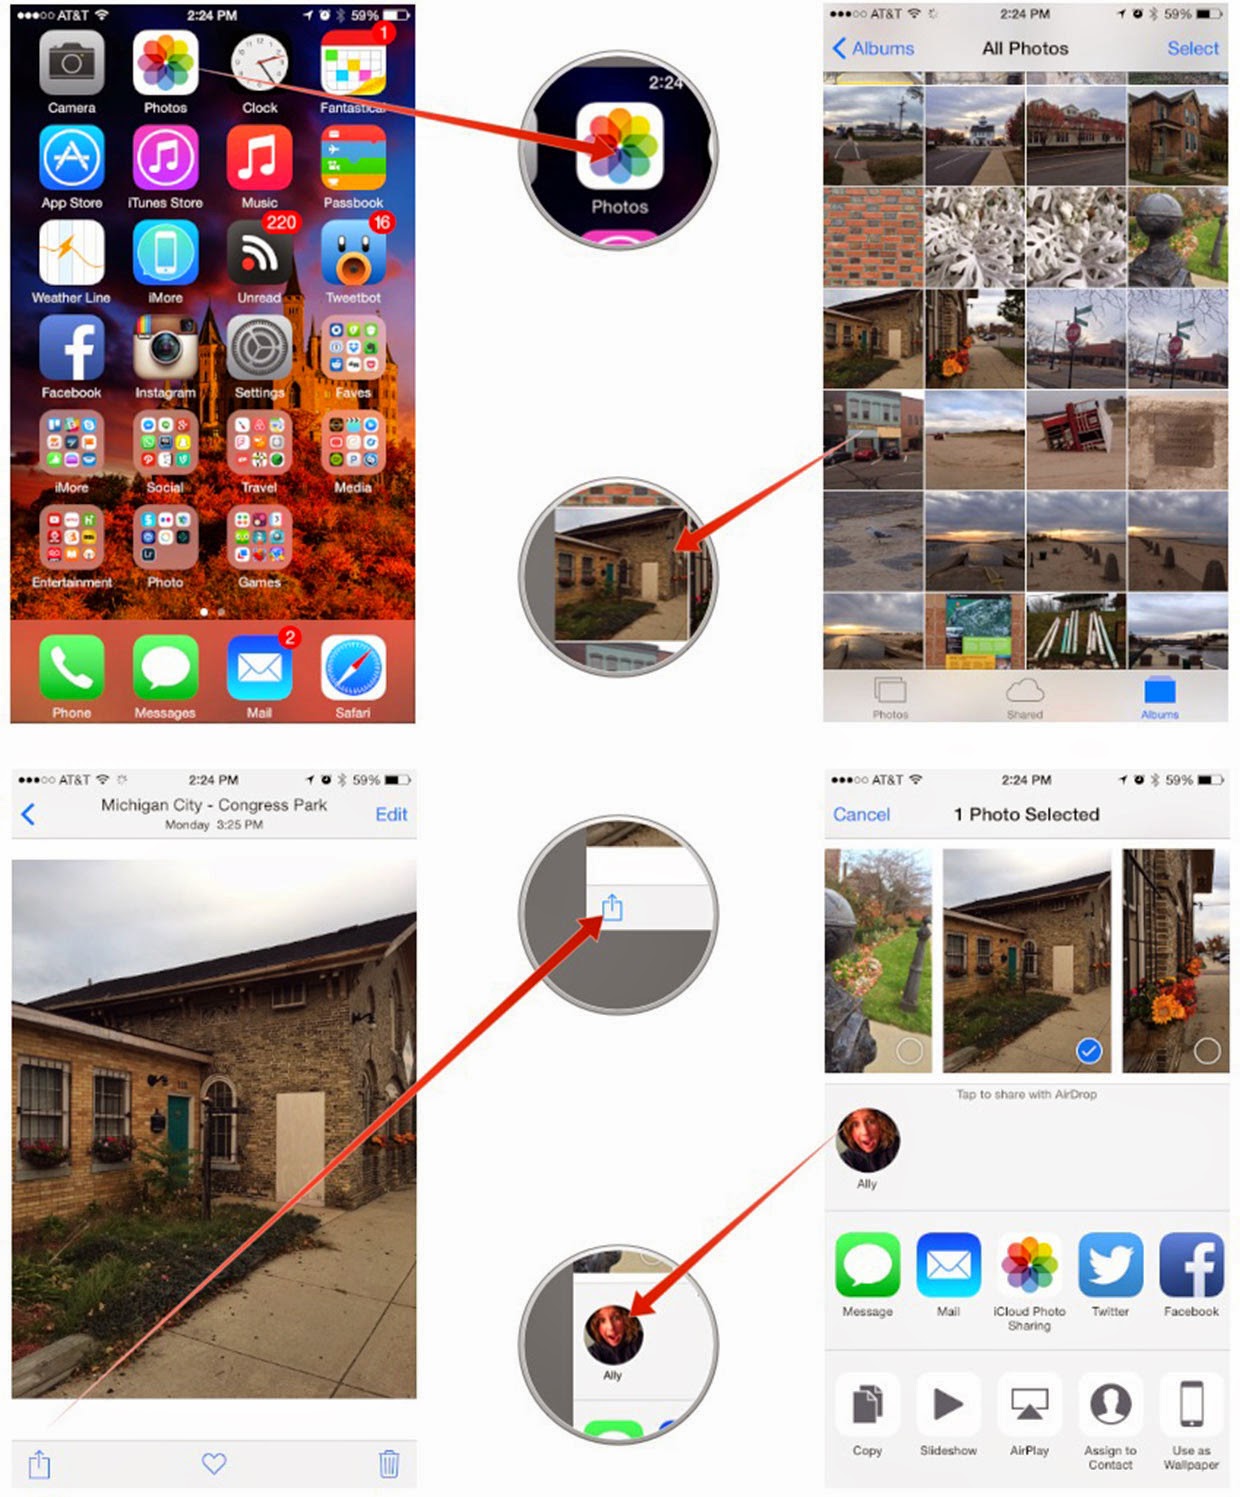
How to enable or disable AirDrop on your iPhone or iPad


  1. Launch centre by swiping your finger up from all-time low edge of your iPhone or iPad. 
  2.  check that each Bluetooth and Wi-Fi square measure activ faucet on delivery.
  3.  opt for the Contacts solely or everybody.
Note: If you decide on Contacts solely, you and anyone you wish to share with has to be logged into iCloud. For privacy reasons, Apple will not share your contacts with another device to see if there is a match, it\'s going to check each your iCloud accounts instead. Then, if there is a match, it\'s going to show you your own version of the contact on your own device. That way, no knowledge gets leaked.
How to transfer files between iPhone and iPad with AirDrop
Find the file you need to send with bringing.faucet the Share button.
opt for the contact you need to bringing to.
 To disable AirDrop, repeat the same steps and choose Off.

How to transfer files between iPhone and iPad with AirDrop
  1.  Find the file you would like to send with delivery.
  2.  faucet the Share button.
  3.  opt for the contact you would like to delivery to.
Once it finishes you ought to see a Sent message beneath it.

How To Setup IMAP For Gmail On Your iPhone

In the event that you haven't listened, Gmail is currently turning into the most obvious email customer on the planet. The explanation behind this is basic, they give their record holders always expanding supply of storage room, and the email interface is amazingly straightforward and simple to utilize. The Google email administration is much the same as the Google web index, there aren't promotions set all around on your page, and you have the capacity find the data (or messages) that you need in a minutes notice. Along these lines, in the event that you are continually on the go, you need to have the capacity to check your Gmail account wherever you are.

In the event that you have an Apple iphone, than you are presumably thinking about how you can incorporate your Gmail account inside the iphone to make checking your email as straightforward as looking at your telephone.

Google has quite recently as of late affirmed that you have the capacity add a convention to your iphone entirely for Gmail accounts. This IMAP application permits Gmail account holders to check their email on any logged off email perusers, which is ideal for people who have an iphone, and actually for those that don't. It is greatly easy to introduce and run the IMAP application on your iphone, subsequently permitting you to flawlessly incorporate your iphone to your Gmail account. The primary venture to starting this procedure is to go to your Gmail account and empower IMAP. You can do this by logging into your Gmail record and after that going to Settings. After that click on Forwarding and POP/IMAP, then click "Empower IMAP."

After you have done in this way, verify that you click Add Account. After you have done thus, don't click the Gmail choice, on the grounds that this has not been upgraded to the freshest IMAP settings. Rather, click Other. When you have done thus, you will then start to enter you data. You will begin off by entering your Name, and afterward you will put the Host Name, which is:  imap.gmail.com after you have done this enter your full Gmail record address, which incorporates the @gmail.com toward the end of your username.

Under the Host Name, you will need to put: smtp.gmail.com then spare the majority of your progressions. You have now quite recently set up your IMAP Gmail account, consequently permitting you to view the greater part of your Gmail messages, both old and new.

Having the capacity to check your email wherever you are is to a great degree vital in our quick paced society. Whether you are a business proficient who needs consistent access to their email account, or in the event that you just need to have the capacity to check your email while enjoying a reprieve in school, you will have the capacity to do so when you actuate your IMAP benefit on your iphone. Openness is absolutely vital in our reality, and in the event that you are not able to answer to email messages rapidly, than you may endure the result, either professionally or socially. With the iphone, you have the capacity stay joined with your general surroundings, regardless of where you are.
جميع الحقوق محفوظة © 2015 pro tech
تصميم : AKBIROCK3